![]()
![]()
![]()
![]()
![]()
![]()
![]()
![]()
![]()
![]()
![]()
|
|
|
|
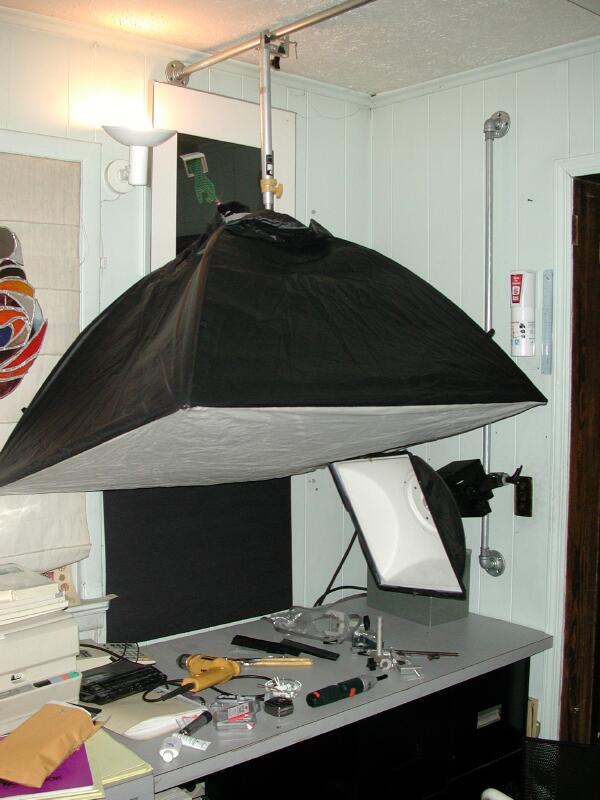
Studio LightingAlthough flash on camera is fine for mobile use, I've always favored tabletop photography and the more controlled light sources that it demands. As of this writing, I'm just now building a small tabletop photography setup in my little home office. I'll be using it to make photographs of food that I cook, and sundry other items. The photo below shows how I'm maximizing the use of a very small area for the setup. I've used conduit on the ceiling and wall as an easy way of mounting my lights without using light stands. I'll probably cut an area out of the tabletop for a backlighting setup, but this is the very first step in the construction of the area (complete with the tools I was using), and I thought it might give you some ideas.
The top light is a Dyna-lite 2000 strobe with a 36"x48" Chimera light bank. The light on the side is one of my Elinchrom Unipack monolights. The flash setup is too powerful for the 990 without adding neutral density (or splitting the flash power to another head and burying it), so I'm playing with the modeling lights.
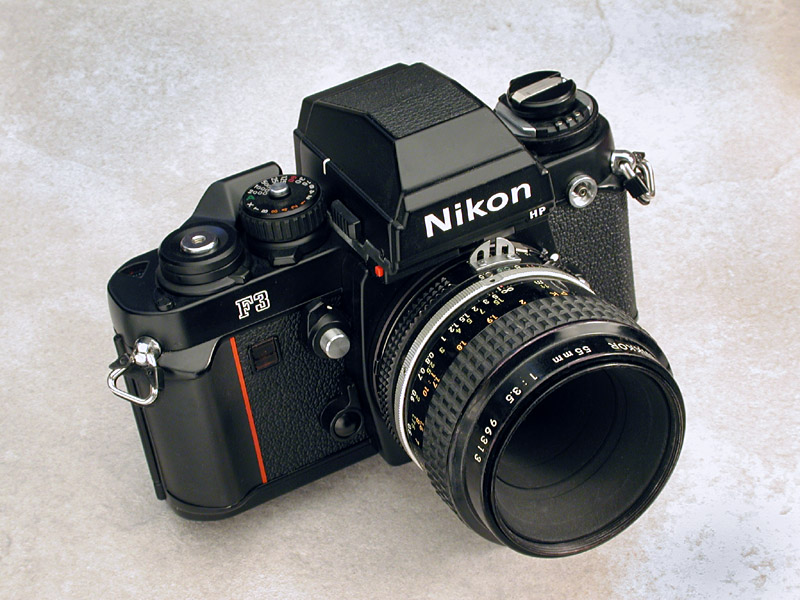
The shot of one of my F3 cameras was done using the modeling lamps of the strobes (with my CP 990 set at 1 second at f/7.6). White balance was set to incandescent, manual focus. A piece of foil was used as a reflector to fill in some of the shadows. I didn't fuss with the lighting much, as I wanted to see what basic lighting would give me. The background was a 12"x12" ceramic floor tile. Long ago in a galaxy far far awayI posted the photo of the tabletop setup in one of the digital camera newsgroups. One of the folk there mentioned the size of the bank light in my office, and that it was pretty big. I ran across a Polaroid that I made in 1981 during the construction of my main studio light (I used this for the next 8 years). The goal was to make a light that was fully articulated, yet I did not want a long counter boom arm.
The photo above shows how I used Speed-Rail's Nu-Rail magnesium railing (the kind used for scaffolding and banisters) to produce a cantilevered design where the weighted end of the arm was no wider than the rolling base. The finished product had an enclosed base, and the weights were neatly attached in the middle of the diagonal arm. Because I was able to adjust the weights and the length of the counterbalance arm with great precision, I could raise, lower or otherwise position the light effortlessly with only fingertip pressure, and it would stay exactly where I put it. By making the yoke and circular locking plates, I could move the bank (which was 42x42") into any orientation.... 360 degrees of mobility on both axes. Back in those days, the stand cost about $250 in Nu-Rail pipe and fittings, which was much less money than the commercial light stands which were in the $2500 - $4500 range, and none of them were better balanced than mine. I found the Polaroid photo when looking for the Nu-Rail information while I was deciding how I'd suspend the lights in my office... a pleasant surprise... and boy, 21 years later I'm still fussing with bank lights < s >. Copyright © 1999-2000 by Zenreich Systems.
All rights reserved. |
|
All text and photographs copyright © 1999 - 2017 Zenreich Systems. All rights reserved. |