Band Adjustment
Richard, here is the second pass at the document, ready for review. There is some formatting that needs to be completed, before publishing.
Overview
The bands on a Kamado are involved in the hinging function needed to open and close the lid and to form a correct and complete seal when the lid is closed. These bands are carefully adjusted, at the time your Kamado is built, to provide a moderately airtight seal between the base and the lid.
This is confirmed at the factory by seeing if a sheet of paper is held firmly at several points around the full circumference of the Kamado when the lid is closed. There should be at least moderate resistance to having the paper pulled out, and we adjust the bands until that benchmark is met.
Performing the Paper Test
-
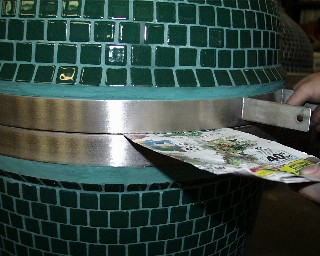
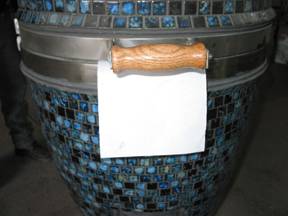
The paper test is an easy and reliable measure of how well the bands are adjusted. Here’s how to do it.
-
Fold a sheet of ordinary 20 pound paper (photocopying paper, laser printer paper, letterhead, etc.) in half.
-
Open the lid slightly, insert the paper, and close the lid.
-
Pull gently and see if there is at least moderate resistance to the paper being pulled out (or, even better, if it is impossible to pull out).
-
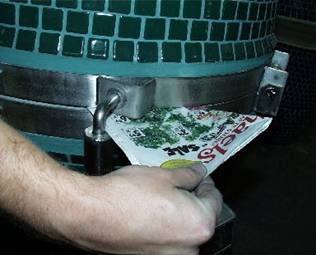
Repeat this process at approximately 45-degree intervals all the way around the Kamado. Pay particular attention to the hinge and handle areas.
-
If the Kamado fails the paper test at one or two places but shows some “grip” at those places, it needs a MINOR band adjustment.
-
If the Kamado fails the paper test at MORE than two places OR if it fails badly at one or two places, it needs a MAJOR band adjustment.
Why Do the Bands Need Adjustment?
-
One reason a band adjustment might be needed is that on rare occasions, rough handling during shipping causes movement of the bands from their factory-set positions. This results in a Kamado having an unacceptable leakage of air from the outset which can make low-temperature control difficult. In extreme cases, it makes it difficult or impossible to extinguish the fire at the end of a cooking session.
-
The other reason is that years of frequent use result in the bands moving enough to affect the integrity of the seal.
In addition to difficulty in temperature and fire control, another symptom of band leakage is uneven deposits of grease on one area of the gasket that separates the lid and dome.
It is important to understand that if there is leakage, it is not caused by warping or other changes in the ceramic surfaces of the lid and base. These areas have been surfaced at the factory and they will maintain a virtually airtight seal if the bands are properly adjusted and an adequate gasket is in place. Leakage simply means that the bands have slipped and need adjustment.
Counting the Bolts
Before attempting to adjust the bands on your Kamado, you MUST determine whether it is a four-bolt or a ten-bolt-through model. The procedure for band adjustment differs for each of these two bolt arrangements.
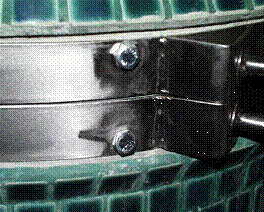
All Kamados have four bolts (two on each side) that mate the front and back parts of the upper (lid) and lower (base) bands:
Some models have six additional bolts near the hinge that pass through the bands and through holes drilled in the Kamado lid and base.
If your Kamado has the six additional bolts, you have a ten-bolt-through model, otherwise you have a four-bolt model.
Band Adjustment for Four-Bolt Kamados
There are two methods of performing a band adjustment in the field, we'll call them "Major" and "Minor".
Do a Major adjustment when any of the following a
- There are major visible air leaks.
- The paper test fails at three or more points.
Do a Minor adjustment when any of the following a
- There are small air leaks.
- The paper test fails at one or two points.
For a Minor band adjustment you need to only perform Step 7 of the Major procedure outlined below.
This “Major” procedure begins with Step 1 and is basically the same as performed in the factory when the bands are first installed or the bands have been removed for shipping or handling.
TOOLS REQUIRED—
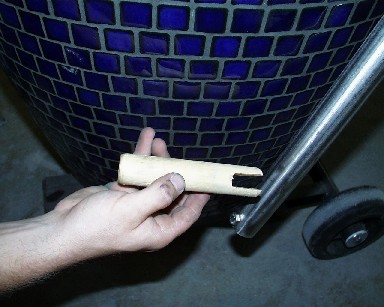
- Spring handler: a homemade dowel or PVC pipe with a slot cut in the end that allows the bolt to be removed while holding the spring up in the tube. This is easily made from a piece of one-inch dowel, broomstick, or PVC pipe.
- Two [size]-inch wrenches for loosening and tightening the bolts
- A hammer and a small block of hard wood, for “tapping” the bands. A piece of pipe, a rod, or a heavy screwdriver will also work.
- You MAY need to provide one or more new [size]-inch bolts, depending on whether or not the originals are reusable.
Step 1:
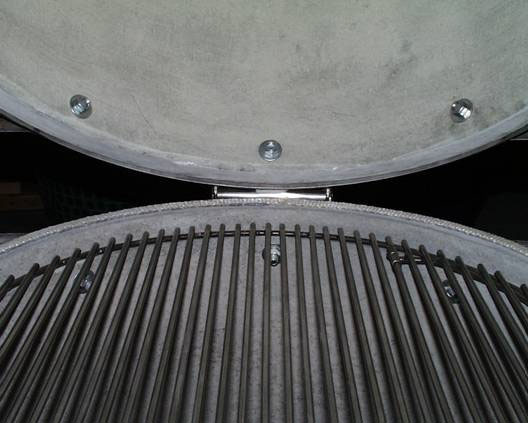
Raise the lid of the Kamado as high as possible and tighten both stopper handles on the spring prop tubes. This will securely hold the lid up.
Step 2:
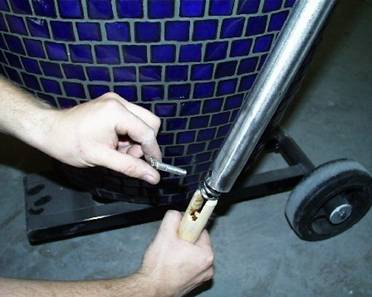
Use the spring handler tool to push the spring up from the bottom of a prop tube. Once the pressure on the bolt is removed, unscrew the bolt that keeps the spring from exiting the tube at the bottom. Slowly release the tension on the spring, and remove it from the prop tube. Repeat on the other prop tube.
Step 3:
Loosen the stoppers and carefully lower the lid. Keep in mind that the springs are removed, so the lid will be heavy. Don't let it drop!
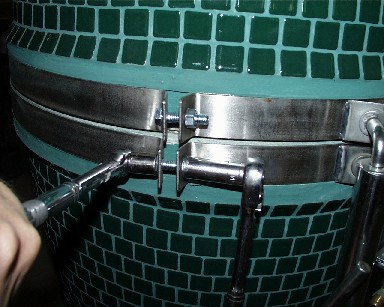
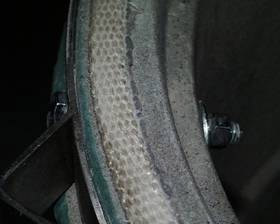
Raise and lower the lid, adjusting the upper and lower bands until they are level with the rims of the base and lid, all around. This can be done by tapping (not pounding) the bands until they slide a bit and are even with the lid and base surfaces.
The goal is not to have the bands touch each other, but rather to have them perfectly level with the top of the ceramic surface of the lid or base. In a proper adjustment, there should be about an eighth of an inch of space, representing the thickness of the gasket that separates and seals the base and lid.
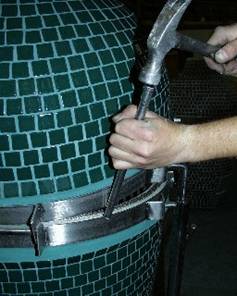
This adjustment can often be done by tapping the bands with a hammer and piece of wood, without even needing to loosen the bolts.
If tapping will not move the bands together, it might be necessary to loosen the band bolts slightly, allowing the bands to be moved, and then retighten.
Step 4:
Do the paper test to see if further adjustment (tapping) might be necessary. Raise and lower the lid several times to be assured there are no gaps.
We insert a folded sheet of newspaper or writing paper to test and make sure the paper cannot be pulled out at any location between the lid and base of the Kamado. This procedure indicate where any potential leaks are.

Step 5:
Tighten the band bolts as tight as possible. This is the key step in a permanent band adjustment.
We understand the inclination to think there is a risk of over tightening the bolts and damaging your Kamado. Your Kamado's compression strength is immense, and the bolts will fail before you could damage the ceramic. At the factory, we often tighten to the point where the bolts are bent, which is why you may have to supply one or more replacement bolts. If the bolts aren’t extremely tight, the bands will slip and you will be right back where you started. Any tightening you can do with hand tools is okay.
Step 6:
Raise the lid to its maximum open position, tighten the stoppers, and insert a spring into one prop tube, using the homemade spring handler. Compress the spring enough to pass the bolt beneath it, then put the nut on and tighten the bolt. This bolt should NOT be tightened to any extreme; its only function is to hold the spring in place, so moderate tightening will do the job. Repeat on the other prop tube.
Step 7 (also the one step necessary for a Minor adjustment):
Loosen the stoppers, lower the lid and perform another "paper test." If there is a slight looseness in the paper test, this can be corrected by tapping the bands with the bolts tight and the springs in. See the examples below.
Examples of leaking (paper test) and suggested corrections:
- Front (at handle). Lid does not close all the way down.
Correction: Tap the hinge upward. Alternating left hinge brace & right.


- Leaking at Hinge Area.
Correction: Tapping is done lightly with the band bolts TIGHT and springs IN. It is considered a final adjustment or minor adjustments after use for some time. Or in the case where shipping or moving has change the band position slightly. If it is difficult to tap the bands for adjustment, a slight loosing of the band bolts should be done. After adjustment and paper test the band bolts should be re-tightened or tightened.
Band Adjustment for Ten-Bolt-Through Kamados
Step 1:
Visually inspect the alignment of the bands at the hinge area.
If the bands are even with the upper surface of the base and lid, then the hinge is centered.
You can adjust the remaining circumference of the band by lightly tapping with a hammer and performing the paper test again.
Note: There is no need to tap on the hinge of a ten-bolt-through Kamado.
Step 2 (optional):
If the bands are not aligned at the hinge (as described above), or tapping does not result in a good alignment, you can create an "upper gasket" that mates with the base's gasket.
- Clean the lid's rim surface (the area that touches the base's gasket) .
- Cover the base's gasket with a layer of waxed paper.
- Apply a bead of high temperature silicon to the waxed paper, following the base's gasket as a guide.
- Lower the lid.
- Wait for the silicon to set (see instructions from the silicon packaging).
- Open the lid, and peel away the waxed paper.
- Trim any silicon that has squeezed out.
Band Adjustment Summary
Band adjustment will rarely, if ever, be needed. But if it is, following these steps will put your Kamado back in tune in just a few minutes.
Frequently Asked Questions
-
How do I know if the bands need adjustment?
- Failure of the paper test.
- Substantial amounts of smoke coming from one or more locations. A small amount of smoke leaking from either the lid or draft door for a few seconds when the lid is first closed is normal.
- Large amounts of grease or carbon deposited unevenly at one or more locations on the gasket.
- Difficulty in extinguishing the fire with the draft door and damper fully closed.
- Visual evidence of the bands not being perfectly aligned with the edge of the lid and base. The edge of the bands should be neither above nor below the ceramic surface.
-
How often is band adjustment necessary?
Often, never. On average, once every two years or after shipment or moving. -
How long does it take to do the adjustment of the bands?
Approximately 10 to 20 minutes for a major adjustment. Minor adjustments can take only a minute or two. -
Is adjustment of the bands necessary if only a small leak of 1/32 of an inch or so? Or if a lot of “low and slow” cooking is desired and/or when the Temperature Controller (Guru or other) is used.
It depends on the use of your Kamado. Nothing is damaged by having a small gap, but for those who do a lot of low-and-slow cooking or who want to maintain sub-200 degree temperatures, optimal band adjustment is essential. -
What is the most common problem in adjusting the bands?
Not tightening the band bolts enough, out of fear that over tightening the bolts will damage the Kamado. This should not be a concern. There are no limits on tightening with simple hand tools. -
What tools are necessary?
-
If a complete band adjustment (removing the springs) or installing the bands after they have been removed would require a dowel or other such instrument, the size of the inside of the prop tube with a slot cut for the retaining bolt.
-
An ordinary hammer.
-
A simple devise to tap on such as a bar, bolt, pipe, rod, heavy screwdriver or similar are all good. Also a very piece of very hard wood works.
-
Two end wrenches to tighten the four band bolts.
-
-
How long have there been Kamado adjustment issues?
From the day Richard designed the first bands 40 years ago. Prior to metal bands, we raised the lid by the ceramic handles cast in the lid. All Kamados, prior to our new Kamado design, did not have compression springs to assist in raising the heavy lid and provide the safety feature of preventing the lid from slamming down. Without compression springs, there is less tendency for the bands to slip. Careful adjustment of the bands is a small price to pay for the convince and safety of the prop assists. -
What can I do to minimize the need for band adjustment?
-
Don’t “torque” your Kamado by lifting the lid unevenly or pushing on lid from one side when it’s open.
-
Tighten the prop tube stoppers evenly when using them to hold the lid open.
-
Don’t drop the lid, even from just a couple of inches high. Lower the lid carefully and resist its drop until the lid and base are in contact.
-
-
What do I do if all my attempts to adjust fail?
A: Please call or email service@kamado.com. We have solved all unique band adjustment problems.